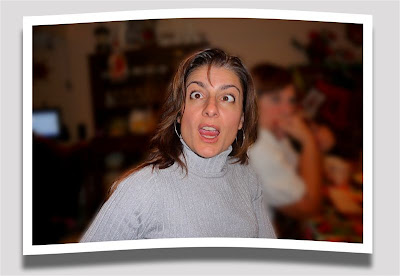
goofy example of me using the bent convex tutorial
tutorial by Maria Urso
good working knowledge of paintshop pro since I don't include screenshots
I did tested this method on paintshop pro 12 but earlier versions it will be pretty much the same. Exception is psp 7 slight modifications as the tools-effects might be
under different sections then later versions.
Convex Bent Method:
-Open up your photo in psp
-resize if necessary, no bigger then print size width 7 inches and height will self adjust
with lock aspect ratio and resize all layers both checked
-no need to sharpen as this will be done afterwards
-Image--Add Borders ...depending on your photo size make the border anywhere from 10 to 80.
with white for color or your choice of border color
-Layers--promote background layer
-Image--Canvas Resize
take note of the Original size and on New Dimensions double the width and height
placement-center
-Image--flip
-Effects--distortion effects--Wave
settings: Horizontal displacement: Amplitude 0
wave length 43
Vertical displacement: amplitude 1
wave length 70
Edge mode: Wrap
-Image--flip
-Adjust--sharpness-sharpen
-with the magic wand click on the transparent area
-Selections--invert
DO NOT DESELECT
-Make the photo layer Invisible
-Add a new raster layer and flood fill it with black
(this is going to be the drop shadow and referred to as drop shadow)
-Selections--deselect
-Adjust--Blur--Guassian blur 6 to 10 or your choice of blur
-Make the photo layer visible
-with the drop shadow layer still on top of the photo layer, drag the drop shadow layer slightly down with the mover tool
-drag the drop shadow layer below the photo layer
-lower the opacity on drop shadow layer to your liking (from 100 to 60 or lower)
-Merge visible
-Image--crop
-Save as a pspimage and the background will remain transparent so it will blend with any project you place it on.
big thank you goes to wannabesupermom at http://www.justmommies.com/boards/lofiversion/index.php/t304938.html
for her wave effect settings
without these settings I would have never figured this out on my own.
if you use this tutorial at your group/s or website please give credit to
Maria Urso
http://sharingtimesofmylife.blogspot.com/


No comments:
Post a Comment