What I have to Say....

Thank you for stopping by. Sharing Times of My Life is a place to share my family and travel photographs. I will be sharing some of my own tutorials which eventually will include my tutorial on how to create your own home-made videos using your own photographs and videos and put it all together to dvd or cd. Anything Paintshop Pro such as tips and tricks and my PSP creations. Recipes I make and that the family actually likes.
Let's see, what else...
Some memorable moments and some that are not.
Showing posts with label tips and tricks. Show all posts

Sunday, February 1, 2009

Colorizing With Paintshop Pro

Scanned this very faded picture of Stino when he was just 7 months old back in 1964.


Then took it to psp
It helped that I had a similar picture that was not faded but just in a different pose and so I was able to match the colors that I wanted to use to colorize the faded one.
I took the one picture that had not faded and used the dropper tool to the blue vest
Then back to the faded picture, I added a new layer and used the selection tool set at point to point and started to draw around half the vest. Then I activated the flood fill tool and clicked in the area where the selection was and did a flood fill.
Then I set the opacity from Normal to color
Continued outlining more of the vest (on the same layer) and flood filled it.
For the face and legs I added a new layer and did the same technique as the vest
And changed the opacity from Normal to Color.

Once all was colorized it looked pretty good but I did play a bit with the filter called alien skin exposure color film and found a setting, that I was happy with which changed the skin tone a little deeper in color.

Adding Contrast to Photos without outside Filters in PSP

Last night I was experimenting with that contrast look but without using the contrast master filter and it can be done without filters in psp.
I tried it with it with psp 7 and psp 12

Psp 7 effects-enhance photo-clarify
Psp 10 up to 12 Adjust-brightness and contrast-clarify

Psp 7 apply the clarify at a setting of 5 as that is the highest it goes to
And apply it 4 or 5 times
In psp 10 up to 12 you apply the clarify set at 20
Once is good but for more dramatic effect it can be applied twice

In psp 7 I used automatic saturation enhancement set at more colorful and strong
In psp 12 you can use Adjust-smart photo fix and slide the saturation slider up to 40 or higher
Or to use the same exact effect as psp's 7 automatic saturation enhancement in psp 10 and higher, you can do this
Go up to View--customize-unused commands and locate Automatic saturation enhancement and click on it and drag it up to the top of your program in the grey area.

Here is the original and look and see the after one which I applied the above effects.


applying the above effects


For a softer look, after applying the above effects, duplicate your background layer (your picture layer) 2 times
On the middle layer apply the guassian blur at 20
The top layer lower it to 50 or a tad higher
You can leave the mode at normal or change it to darken for a totally different look
I set this one at the opacity of 69 and changed the mode to darken.

Saturday, January 31, 2009

Adding Contrast to your Photos

I was reading my e-mail subscription by Harold Heim (you can subscribe here, just scroll to the bottom)on the plugin filter called Photo Wiz Contrast Master.
It sure adds interesting contrasts to any photo. More information about it here.
It's compatible with paintshop pro 7 and up.

Here is some examples of before and after.
Picture that Stino took in Fussen Germany. The second one I used PhotoWiz Contrast Master. I played around with the settings. I then used psp's noise remover and enhanced the color.


On the picture of Carlina I used the expert settings which are east to use. Just a bunch of sliders that you can play with for a different effect.

Sunday, January 18, 2009

HOW TO FIGURE OUT ASPECT RATIO

For those of you interested in a PSP tip that I learned awhile back..

Have you ever created your own frame and then you want to add your own picture or other graphic but
It looks distorted. Either too skinny or too wide


and here it is correctly done

Here's how to remedy that...


You have a frame opened up in psp

On your frame use magic wand to select the transparent area or white area. (the inside of the frame)
(or you may even have to just use the selection tool at freehand and draw along the inside of the frame and then there will be marching ants. Or depending on the frame's shape you can just use the selection tool set at rectangle)


So now there are marching ants
then you do this Edit--copy
Edit--paste as a new image on psp's workspace

then go to Image--resize (located at the top of psp is IMAGE--resize)
take note of what it says for maintain aspect ratio. Take note of this number.
Now you can close this new image that you pasted as you will no longer need it.

Go back to the photo you would like to place in your frame.
with your selection tool set to rectangle (make sure feather is at 0)
(at this point make sure your status bar is open, the status bar is located at the very bottom right side where you will see all sorts of numbers (for psp 7 it is on the left side).


(if it isn't there you will have to access your toolbar options and check it off)
The numbers you need to look at are the numbers that are in brackets and they are the brackets that are to the very right (last set of numbers)

now say for example when you jotted down those aspect ratio numbers and say they were 1.333
then when you go to your photo with the selection tool, just start making a selection around the photo but notice those status bar numbers in the brackets and try to match them to say for example the 1.333

now when you have it selected but you don't like how the selection is located, all you have to do is click the mover tool and right click your mouse button and move the selection to where you like it


When you have it selected to where you like,
Edit--copy

go back to your frame and Edit-- choose paste into selection

Friday, January 16, 2009

Bent Photo Scripts for Paintshop Pro

If you would like to try PSP scripts to get the bent concave or convex look to your photos, I have uploaded them here.
They are so super cool to use. In the zipped folder with the scripts I have also included the tutorial on how to achieve this bend to your photos without using scripts.

I came upon these scripts last night in attempt to look for a tutorial on how to curl just the corner of a photo without using the curl effect which I'm not so crazy about, but instead I came upon the bend the whole photo scripts.

I don't know how to get a hold of the gal who created these bent photo scripts
If anyone knows how, please email me at mayflower1965@msn.com
They are really wonderful and thank you for sharing .
I have included in this Zip file the two bent photo scripts and the video on how to apply them in paintshop pro.
Both scripts and video are not mine and by Wannabesupermom--Teresa (whom, I don't know how to get a hold of)


To see the original page I got the scripts and video from;

http://www.justmommies.com/boards/lofiversion/index.php/t304938.html

To obtain the convex and concave bent photo scripts go to the above link
And then right click on each of the links for the scripts
right click and choose Save target as and where it says .htm change that to .pspscript
Save it to your desktop first and then place it in your psp's restricted scripts folder.
This is if you don't want to use Rapidshare to obtain the two scripts.
Also there is a video showing you how to use the script
See link below for that

Wannabesupermom
Aug 13 2006, 04:18 PM
I posted this in the main forum, but thought I'd post it here as well.

Ok, editing this because I have done some tweaking and I now have a convex script and a concave script which I think are pretty darn close to the PS bent photo version.

Bent Photo Script PSP X and above.

Here's the file you will need to download

Convex bent photo script
right click and choose Save target as and where it says .htm change that to .pspscript

Concave bent photo script
right click and choose Save target as and where it says .htm change that to .pspscript

*Note photos must be at least 125x125 pixels for script to work.


And here is a video showing you how to use it http://www.justmommies.com/videos/pspbentphoto1.wmv

You just have to open up the photo you want to bend and then load the script. Just remember where you save it to so when you go to run it you can find it. The video gives you instructions on it. It's using the original script I did, but basically the same thing. Just shows you how to load it and you just should have to click ok all the way through to the end.

Oh, if you want it without the white border when you get to the spot that adds the white border just change the number to 0 instead of 2. You can also make the border bigger if you want it to be thicker. PS bent photo action has a bit thicker of a border so you can adjust it up if you like too. Once you click ok it should finish out the script for you.

Bent Convex Photo tutorial using Paintshop Pro


goofy example of me using the bent convex tutorial

tutorial by Maria Urso


good working knowledge of paintshop pro since I don't include screenshots
I did tested this method on paintshop pro 12 but earlier versions it will be pretty much the same. Exception is psp 7 slight modifications as the tools-effects might be
under different sections then later versions.

Convex Bent Method:
-Open up your photo in psp

-resize if necessary, no bigger then print size width 7 inches and height will self adjust
with lock aspect ratio and resize all layers both checked

-no need to sharpen as this will be done afterwards

-Image--Add Borders ...depending on your photo size make the border anywhere from 10 to 80.
with white for color or your choice of border color

-Layers--promote background layer

-Image--Canvas Resize
take note of the Original size and on New Dimensions double the width and height
placement-center

-Image--flip

-Effects--distortion effects--Wave
settings: Horizontal displacement: Amplitude 0
wave length 43
Vertical displacement: amplitude 1
wave length 70
Edge mode: Wrap

-Image--flip

-Adjust--sharpness-sharpen

-with the magic wand click on the transparent area

-Selections--invert
DO NOT DESELECT

-Make the photo layer Invisible

-Add a new raster layer and flood fill it with black
(this is going to be the drop shadow and referred to as drop shadow)

-Selections--deselect

-Adjust--Blur--Guassian blur 6 to 10 or your choice of blur

-Make the photo layer visible

-with the drop shadow layer still on top of the photo layer, drag the drop shadow layer slightly down with the mover tool

-drag the drop shadow layer below the photo layer

-lower the opacity on drop shadow layer to your liking (from 100 to 60 or lower)

-Merge visible

-Image--crop

-Save as a pspimage and the background will remain transparent so it will blend with any project you place it on.


big thank you goes to wannabesupermom at http://www.justmommies.com/boards/lofiversion/index.php/t304938.html
for her wave effect settings
without these settings I would have never figured this out on my own.


if you use this tutorial at your group/s or website please give credit to
Maria Urso
http://sharingtimesofmylife.blogspot.com/

Bent Concave Photo tutorial using Paintshop Pro


tutorial by Maria Urso
mailto://mayflower1965@msn.com

good working knowledge of paintshop pro since I don't include screenshots
I did tested this method on paintshop pro 12 but earlier versions it will be pretty
much the same. Exception is psp 7 slight modifications as the tools-effects might be
under different sections then later versions.

Concave Bent Method:
-Open up your photo in psp

-resize if necessary, no bigger then print size width 7 inches and height will self adjust
with lock aspect ratio and resize all layers both checked

-if resized then sharpen...Adjust-sharpness--sharpen

-Image--Add Borders ...depending on your photo size make the border anywhere from 10 to 80.
with white for color or your choice of border color

-Layers--promote background layer

-Image--Canvas Resize
take note of the Original size and on New Dimensions double the width and height
placement-center

-Effects--distortion effects--Wave
settings: Horizontal displacement: Amplitude 0
wave length 43
Vertical displacement: amplitude 1
wave length 70
Edge mode: Wrap

-with the magic wand click on the transparent area

-Selections--invert
DO NOT DESELECT

-Make the photo layer Invisible

-Add a new raster layer and flood fill it with black
(this is going to be the drop shadow and referred to as drop shadow)

-Selections--deselect

-Adjust--Blur--Guassian blur 6 to 10 or your choice of blur

-Still on the drop shadow layer: Image--flip

-drag drop shadow layer beneath the photo layer

-make the photo layer Visible

-click on the drop shadow layer adn with the mover tool, drag down the bit of black you see,
until you no longer see any black on the top.

-lower the opacity of the drop shadow layer from 100 to 60 or lower.

-Image-crop

-Save as a pspimage and the background will remain transparent so it will blend with any project you place it on.


big thank you goes to wannabesupermom at http://www.justmommies.com/boards/lofiversion/index.php/t304938.html
for her wave effect settings
without these settings I would have never figured this out on my own.


if you use this tutorial at your group/s or website please give credit to
Maria Urso
http://sharingtimesofmylife.blogspot.com/

Tuesday, January 13, 2009

How to Add a New Blog Header

1. Save your new blog header to your hard-drive.

2. Sign in to your blogger account

3. Click on Layout and now you're at Add and Arrange Page Elements
Or if you are signed in then just click on Customize

4. Click on the Edit button next to your blog name

5. And you will go to a window .Check off Placement---behind title and description, if your new blog header does not contain your own added text of your blog's name.
If you have edited your new blog header and added text to it then on placement choose this option---instead of title or description.
6. Next,browse for the image and save the changes after the image has uploaded.

7. Also don't forget to Save Page elements. This is located on the top right corner where it says Preview, Clear Edits and Save. Click Save

How to Add a New Blog Background

BACKGROUNDS INSTRUCTIONS...

1-Log into to your blog and click on 'customize'

2-In the 'Pick New Template' tab, you must change your template to 'minima' (not minima ochre or others, just plain white minima)

3-Click on 'edit html' on the far right

4- In the code, scroll to where you see this:

body {background:$bgcolor;margin:0; color:$textcolor; font:x-small Georgia Serif; font-size/* */:/**/small; font-size: /**/small; text-align: center;}

5-Change that part of the code to say this:

body {background:$bgcolor;background-image:url(direct link);background-position: center; background-repeat:no-repeat; background-attachment: fixed;margin:0; color:$textcolor; font:x-small Georgia Serif; font-size/* */:/**/small; font-size: /**/small; text-align: center;}

6-Find the blog background you like, and copy and paste the link below it between the parenthesis where it says '(direct link)'

7-Please give credit to the blogger background or blogbheader creator for their work.

Lots of pretty blog backgrounds here
http://alliebrownslayouts.blogspot.com/
and here
http://shelsscraps.blogspot.com/

Thursday, November 6, 2008

Framing a Photo in PSP

Here is the original photo of Carlina's friend Cera and I thought our kitchen wall looked rather empty and boring so ..........


I thought I would dress up the wall with a few frames. Took the picture of Cera to psp and this one that I wanted to frame.


In PSP go up to Image--Picture Frame. Choose a frame, click ok. Paste it as a new layer to your photo. Resize the frame (Image--resize). Don't forget to sharpen it once you have the size you like. Position it to your liking.

Add a drop shadow to the frame if you like. Use the deformation tool (D on the keyboards) and hold down the shift and ctrl key if you need to angle it.

Making Big Heads in PSP

This is the original photo.


I wanted to make it funny so I took it to psp and made all their heads bigger.

I used the Sock Monkey Madness Scrapkit by Kate Hadfield. For each head this is what I did. I used the freehand selection tool set at point to point and feather of about 4 or 5. I traced the head with selection tool and then once I had what I wanted selected, I went to Edit--copy --Edit paste as new layer. Next deselect and then I resized it, Image--Resize. I can't quite recall how much percentage I used but I'm guessing about 115 pixel dimension and all layers unchecked. Once you have it to the desired size, sharpen it (Adjust - sharpness - sharpen)

Position it to your liking and continue with the same procedure for any other heads you want to enlarge.

Two Paintshop Pro Tips

I would say this first tip is for psp 10 and higher. Might be for psp 9 as well but since I use version X2, and don't have psp 9 installed, I really don't know if this tip will apply. This is not my tip and I found it on a website a few days ago and wish I had bookmarked the site, but didn't.

Removing the Automatic Crop Tool Rectangle Shading
There’s an annoying feature (turned on by default)
that automatically creates a crop rectangle when you select
the Crop Tool, which can get in the way when you just want
to click and drag to create your own selection. Another annoying
aspect of this feature is that you don’t disable it through
the Crop Tool options, which would be the most logical place.


so by default it looks like this when you are about to crop a photo, graphic.
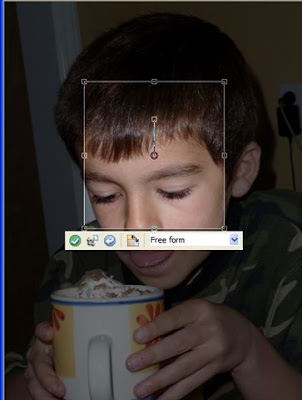

see how the surrounding area is shaded. But you can get rid of that shade by doing this.
File » Preferences » General Program Preferences » Transparency and Shading
and uncheck Automatically display crop rectangle. That's one option.
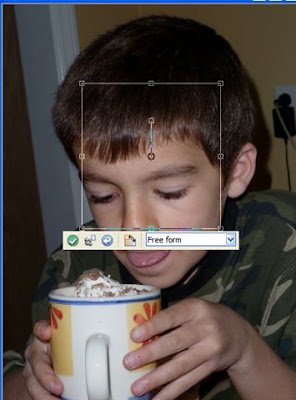
But what I did that worked better was that I changed the opacity to 9 and left the crop shade area checked.
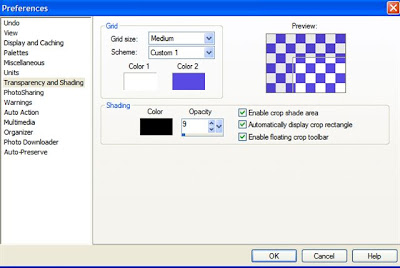

Now when I use the crop tool there is no more shading. Looks like this.

Hidden Photo Enhancing Effects Tip
This next tip, I CANNOT believe I am only learning it now. Also got it from the same website as the first tip but of course don't have that website bookmarked. I should check my history and perhaps it will still be there.

Well, I'm back and good ole history still was there in internet explorer and I found the website with these good tips.
http://teom.coningham.net/psp-x/

On to the next tip which I love, because I use psp mainly for photo editing and enhancing.
In psp 7 I used on a daily basis under Effects--enhance photo-automatic color balance
and automatic contrast enhancement and automatic saturation enhancement.
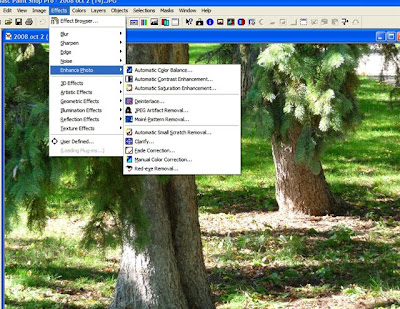

I think it must have been version 9 or 10 and those effects were gone.
This tip that I found is for 10 so not sure if it will be the same for version 9 but I do know it will work for version 11 and 12

In version 10, X1 and X2 they have Adjust--smart photo fix which I tried and just never liked but now with this tip, I have my 3 most used photo enhancing effects back at the top of my toolbar.

Go up to:
View » Customize » Commands » Unused Commands you will find the 3 effects I mentioned all there.
You can click on their name and drag it to the menu up top.


Here is what my toolbar looks like in psp X2


You'll have to click on it to get a larger view of the screenshot. The yellow highlighted part is the 3 photo effects that I used all the time in psp 7 and now can also in psp X2. The green highlighted part is just showing that you can customize your toolbar with your most used effects. Instead of always having to go to Effects--3D effects and then drop shadow or inner bevel, etc, I just have that tool right on my toolbar and one simple click and it's right there.

Thursday, October 2, 2008

Aging a Photo

I think it's pretty cool to play in paintshop pro and experiment with plugins.
I wanted to see about aging a photo. I took this picture today over at Roxy Park and then the next photo under it is the same picture but with the aging effect.


Click on the aged photo to get a better look at it.

Here is the tutorial on how to get this aging effect:

Maria's Aging a Photo Effect
I used paintshop pro 12 but earlier versions can be used with modifications
on the original photo, I duplicated it in the layer palette.
On the duplicate layer, I changed the Mode from normal to Screen and left it at 100%
Merge Flatten
Adjust--Brightness and contrast--clarify setting at 20 and apply this setting a total of two times or to your liking
Plugins--Filters unlimited (found under ICNet) Photo aging kit--Old color with settings of 133 182 112 or settings of your choice
Filter Factory U--Bulging Edge Plus 163 and bottom setting you will have to play with
it can be from 110 to 156
Back to filters unlimited Photo aging kit--hair and dust settings your choice
Filters unlimited photo aging kit-photo frame 3 or your choice
That's how I did it.

Monday, September 15, 2008

Another Warm Beautiful Day in Winnipeg

What a great Fall day here in Winnipeg. Stino didn't have to work today so he kept himself busy with some yard work. I kept myself busy with a project for my father-in-law.
This project, I have a feeling will take many hours, months to complete. He bought an ADS tech instant music. This little gadget I guess is called a digitizer. So, it enables me to connect it to my ghetto blaster and play a cassette and using the ADS tech, it gets connected to one end of the ghetto and the other end to a USB port on my laptop. Then I have to open up the software it comes with which is Nero Soundtrax. Once Soundtrax is opened up, then I start to play the cassette on the ghetto blaster and click on the record button on the soundtrax.
This can and does take quite some time. If side A of the cassette is 30 minutes, then that is how long it takes to record all of side A. Once that is done, then it goes to the wave editor where I have to split up each track and then I have to save each track and name it to. If I chose not to split it, then all of side A would have been one very long wma file.
I did 3 cassettes for him and even burned them to a CD.
I was really impressed with the sound and even did one of my cassettes. Darn, it's so cool that I now have all my cassettes and FIL's to do.
I think I should install the ADS tech software to my desktop computer which then will free my laptop and I can start my digital scrap stuff instead of music.
When the cassette was being recorded to my laptop, I went outside and took a few pictures.
Took some pictures of Stino cutting the hedges, weeds in our yard lol, trapped wasps on our deck, (thank goodness that is where they are) our tomatoes, and grapes.


I really like the background on this pretty weed picture. I call it a weed as I have no idea what is the real name. Maybe it is not even a weed but some kind of wild flower. If you click on it, it will enlarge and you can really see the swirlies in the background.


The Urso's

The Urso's

Friend's-Family Corner

..

Don't hit the fish on the head