What I have to Say....

Thank you for stopping by. Sharing Times of My Life is a place to share my family and travel photographs. I will be sharing some of my own tutorials which eventually will include my tutorial on how to create your own home-made videos using your own photographs and videos and put it all together to dvd or cd. Anything Paintshop Pro such as tips and tricks and my PSP creations. Recipes I make and that the family actually likes.
Let's see, what else...
Some memorable moments and some that are not.
Showing posts with label framing. Show all posts

Tuesday, February 10, 2009

Few More Old Photo Borders


Here is the examples of what these 4 old photo borders look like. These are in psp format.

My friend Andrea (Oct 24, 2007) I bet we were heading to a concert.


Oct 13, 2007, down our street on a foggy morning. I used the colorize in psp to give it this sepia color.


Oct 22. 2007 Stino and Anthony. Used filters Unlimited Aging Kit.


Picture of me with Carlina was taken Nov 20, 2007, Stino and I, Oct 22, 2007 and picture with Anthony was taken Sept 22, 2007. I used filters Unlimited Aging Kit to give it this look.

These Old Photo Borders can be downloaded here

or at megaupload here

Monday, February 9, 2009

Artrage Doodles Turned into Tubes

Was fiddling this afternoon with the program Artrage again and I added some more doodles to the previous collection I had made. I have them all zipped and can be downloaded here.
Here is a preview of my Artrage tubes


I drew them all in Artrage and then exported them as jpegs. Took one at a time into Animation Shop and used the color replacer. I chose for it to remove the white background and to make it transparent. Took it to psp and saved it as PNG. I have to check if I can save it in AS in that format. Forgot to even check.

Hope someone can use these silly doodles.

Thursday, January 29, 2009

Butterfly Polaroid Frames by Sonel


I really like picture frame borders and this one that Sonel is sharing is just lovely.
You can get this Butterfly Polaroid Frames over at Sonel's Corner

I used a picture of my mother from 1960. That would make her only 14 years old. She looks much maturer than that but she was born in 1946 so that would add up. Her name is Francelina. A name she says she has never liked. Well, welcome to my world, I don't like mine either lol.
We were both born in Faial Azores (Açores)known as the Blue island. Very tropical and beautiful and in January 1971 moved to a very shocking bitterly cold white snowy Winnipeg Manitoba and I've lived here ever since.

Monday, January 26, 2009

Playing with ArtRage

Last night, Stino and I were watching 'in the electric mist' with Tommy Lee Jones. I got a bit confused and opened up this program called Artrage.
It truly is a very cool program. Just wish I had the knack to draw. Well,never mind draw, even my doodles are pretty silly.
But, I have to say, I loved playing around with it. I made some doodle hearts and frames. I then exported it and took it to jasc's animation shop were I used the color replacer to completely remove the white background and give it a transparent background as well as the center. Then took it to PSP and saved it as a PNG.

Here's my doodles


I know, I know they're goofy lol.
How I added a photo to the heart frame. In psp, I used the magic wand and clicked on the inside of the frame. Selections--modify--expand 2 or 3.
Then I added a new layer and dragged it below the heart frame and still keeping it selected.
I then followed my aspect ratio tutorial here

I've zipped up my silly doodles in case anyone out there would actually use them. They can be downloaded here
And now I'm truly in much need of a nap. Been staying up too late reading Maureen McCormick Here's the Story
It's a very interesting book and talks about all the destructive things that went on in her life and I'm on page 200 so am hoping there is a very nice happy ending. Although it can't be the end as she is still here lol. I just would have never thought anyone could do all they did and still be alive.

ok nap time...

Sunday, January 18, 2009

HOW TO FIGURE OUT ASPECT RATIO

For those of you interested in a PSP tip that I learned awhile back..

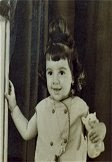
Have you ever created your own frame and then you want to add your own picture or other graphic but
It looks distorted. Either too skinny or too wide


and here it is correctly done
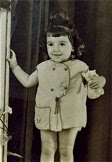
Here's how to remedy that...


You have a frame opened up in psp

On your frame use magic wand to select the transparent area or white area. (the inside of the frame)
(or you may even have to just use the selection tool at freehand and draw along the inside of the frame and then there will be marching ants. Or depending on the frame's shape you can just use the selection tool set at rectangle)


So now there are marching ants
then you do this Edit--copy
Edit--paste as a new image on psp's workspace

then go to Image--resize (located at the top of psp is IMAGE--resize)
take note of what it says for maintain aspect ratio. Take note of this number.
Now you can close this new image that you pasted as you will no longer need it.

Go back to the photo you would like to place in your frame.
with your selection tool set to rectangle (make sure feather is at 0)
(at this point make sure your status bar is open, the status bar is located at the very bottom right side where you will see all sorts of numbers (for psp 7 it is on the left side).



(if it isn't there you will have to access your toolbar options and check it off)
The numbers you need to look at are the numbers that are in brackets and they are the brackets that are to the very right (last set of numbers)

now say for example when you jotted down those aspect ratio numbers and say they were 1.333
then when you go to your photo with the selection tool, just start making a selection around the photo but notice those status bar numbers in the brackets and try to match them to say for example the 1.333

now when you have it selected but you don't like how the selection is located, all you have to do is click the mover tool and right click your mouse button and move the selection to where you like it


When you have it selected to where you like,
Edit--copy

go back to your frame and Edit-- choose paste into selection

Whole Bunch of Old Photo Borders to Share

I tubed some more old photo borders last week. They're all in psp format. Here are the examples and at the bottom of the last picture is the download link.


Download link here or here (megaupload)
All the old photo borders will be in this one zipped folder. It was just easier for me to do it that way, instead of uploading one photo border at a time.

Just a note why these old photo borders and previous ones I shared have several layers. You will notice that there is a layer called 'drop shadow optional'. If you dont like this drop shadow, you can just click on the layer and delete it. Some photo borders contain a colored background which will be on a seperate layer and you can also delete it. Sometimes some of the elements such as the staples will also be on a seperate layer. I did this in case someone doesn't care for them, then it is easily deleted. You will also notice that there is a layer called photo here and that there is a selection marquee when you open up the photo border in psp. You can copy the picture you wish to add to the photo border and then choose paste into selection.
I will be including shortly a tutorial on how to get correct aspect ratio when pasting into selection so that the photo being pasted isn't distorted.

Friday, January 16, 2009

Grungy Frame Borders

I created these frame borders a year ago. I even have the notes on how I created them which I will add another time.
I guess I should have changed the name to old frame borders but decided to just keep the name.
Here is what they look like.


you can download them here or at megaupload here.
They are both included in the zipped folder.

Photo Borders created with Dreamsuite Filter

I created these two border frames some time back using the dreamsuite filter. I wish I had kept notes on how to recreate it.
Here is the examples and download link to follow.


picture of my cousin carlos


and this is me with my dolly. This picture was taken in Faial Acores where I was born.

To download two dreamsuite border frames go here.

Old Photo Border created today

Found some of my old notes with no description as to what it was. Any how I followed it and it's the tutorial for one of the frames I created last year.
I'll include the tutorial on how to get this frame look another time as I will have to upload xenofex filter and twisting pixel filter.
Here is the example

You can download this photo border frame here. It is in psp format.

Old Photo Border created Jan 15, 2009

This one I created yesterday in paintshop pro 12.
Here is an example.

you can download it in psp format here.
Next I want to learn how to curl a corner. I tried and have a long way to get it right. I'm going to keep trying and looking for a tutorial. I might even be able to find a psp script that does that.

Any how here is what I came up with

It needs more curl and depth. Back to the drawing board.

Old Photo Border created Jan 14, 2009

On Wednesday I created this old looking photo border in psp. Here is an example of it.

Here is where you can download the border in psp format here.

Monday, January 12, 2009

Another Old Picture Photo Border 2

Here is another really nice old picture photo border I came upon in someone's blogspot. I saved it and tubed it just now. I wish I had kept track of where I got this border from, but unfortunately I did not.
Here is an example.

I took this picture from our patio door this morning at about 8:21 am. I was surprised to see such a brilliant full moon still out.
I enhanced it with psp and also cloned out the cables.
Here is the original picture


Download it here, there is a drop shadow which you can just use the freehand selection tool and tube it out. I left it as I liked it. This time it is in PNG format. Works in psp 9 and up. If anyone does need it in psp format you can always email me at mayflower1965@msn.com

Sunday, January 11, 2009

Sharing a few more Old Photo Borders

I created this old photo border quite some time back.
Here is an example of what it looks like.

Download it here. There will be 3 of these borders in the zipped file.

Bent Photo Borders 5 - 8

Last of the bent photo borders for tonight.
Example

download all the bent photo borders which include from number 1 to 8 here

Bent Photo Border 3 - 4

Here's another I added. This one has no border. Slightly bent with a drop shadow in psp format.
Example

download it here
zipped file will contain a bent bordless horizontal and vertical template as well as bent photo borders from 1 to 8.

Saturday, January 10, 2009

Bent Photo Border 1 - 2

I added another photo border. This one is on an angle with slightly bended. Drop shadow is included. It is in psp format.
Here is an example


Download it here
includes to bent photo borders. One of them is a plain border and the other a textured border. Also includes Bent photo borders from 1 to 8.

Old Picture Border 1

Some time ago, I came upon some really nice pictures in someone's blogspot. I really liked the border they used. I saved it and tubed it earlier. I wish I had kept track of where I got this border from, but unfortunately I did not.
Here is two examples.
me, carlina and my mom

picture of our little house that was taken a few weeks ago. I used alien skin doctor black and white film to add grain and slight sepia tone.


It's in psp format and it will not have a drop shadow.
Here is where you can get it
http://www.megaupload.com/?d=U9H5FDM8

Thursday, November 6, 2008

Framing a Photo in PSP

Here is the original photo of Carlina's friend Cera and I thought our kitchen wall looked rather empty and boring so ..........


I thought I would dress up the wall with a few frames. Took the picture of Cera to psp and this one that I wanted to frame.


In PSP go up to Image--Picture Frame. Choose a frame, click ok. Paste it as a new layer to your photo. Resize the frame (Image--resize). Don't forget to sharpen it once you have the size you like. Position it to your liking.

Add a drop shadow to the frame if you like. Use the deformation tool (D on the keyboards) and hold down the shift and ctrl key if you need to angle it.

The Urso's

The Urso's

Friend's-Family Corner

..

Don't hit the fish on the head